- Published on
- // 8 min read
Hacking OpenShift Productivity with QMK
- Authors
- Name
- Shane Boulden
- @shaneboulden


I've noticed that there are several commands I frequently type when building and testing out new OpenShift applications. oc apply -k . is one of them, and usually I try a reverse search to see if I have a sneaky oc apply -k . hiding in my local history. But, by the time I type oc apply -k, I'm most of the way there anyway, and I've also had to hit Ctrl-R to start the reverse search! I don't have the patience for all this typing - and I think QMK can help.
QMK overview
Recently I picked up a keyboard that supports Quantum Mechanical Keyboard (QMK), an open-source firmware for microcontrollers. The project's goal is to provide an extensible firmware for any microcontrollers, but at the moment it's firmly targeted at keyboards.
QMK is incredibly powerful, and you can build practically any workflow directly into your QMK-enabled keyboard. It can be a bit intimidating to get started though, and there's several open source tools to make working with QMK easier:
- QMK Toolbox: A collection of flashing tools packaged into one app, making it simpler to get your compiled firmware onto a device.
- QMK Configurator: An online tool for creating firmware files for QMK keyboards. It allows you to create a simple keymap and store this in a JSON file, and also generates firmware files that you can flash to your device.
- VIA: An online tool that lets you make changes to your QMK keyboard without needing to flash new firmware.
Because I wanted to use some newer QMK features for this article which aren't yet supported in VIA, I need to go a bit deeper. In the sections below I'll create a keymap, compile it, flash it to the device, and see my OpenShift developer workflows available directly from the keyboard firmware.
Setting up the QMK development environment
I've created a really simple development environment for QMK on Fedora. Firstly there's a few dependencies needed:
$ sudo dnf install gcc unzip wget zip dfu-util dfu-programmer avr-gcc avr-libc binutils-avr32-linux-gnu arm-none-eabi-gcc-cs arm-none-eabi-binutils-cs arm-none-eabi-newlib
You can install the qmk CLI into a Python virtual environment, and I've simply created a new Python virtual environment on Fedora 38 and installed qmk:
virtualenv .qmk
source ~/.qmk/bin/activate
pip3 install qmk
You can then use the qmk setup command to create a new copy of the QMK source:
$ qmk setup
☒ Could not find qmk_firmware!
Would you like to clone qmk/qmk_firmware to /home/user/qmk_firmware? [y/n]
When you select yes, the qmk binary will pull down the latest copy of the QMK source and all Git submodules.
The next step is to configure a default keyboard, which you can also do with the qmk binary. You can derive the keyboard name from the QMK firmware directory structure. You'll find a directory keyboards, and under each of these a vendor and model numbers. In this case I'm using the Keychron V6 ANSI layout:
$ cd qmk_firmware
$ tree keyboards/keychron/v6/ansi
keyboards/keychron/v6/ansi
├── ansi.c
├── config.h
├── info.json
├── keymaps
│   ├── default
│   │   └── keymap.c
│   ├── keychron
│   │   ├── keymap.c
│   │   └── rules.mk
│   └── via
│       ├── keymap.c
│       └── rules.mk
└── rules.mk

$ qmk config user.keyboard=keychron/v6/ansi
Now, I can create a new keymap. By default qmk will name this with your GitHub username:
$ qmk new-keymap
Ψ Generating a new keymap


Name Your Keymap
Used for maintainer, copyright, etc

Your GitHub Username?  [shaneboulden]
Ψ Created a new keymap called shaneboulden in: /home/user/qmk_firmware/keyboards/keychron/v6/ansi/keymaps/shaneboulden.
Ψ Compile a firmware with your new keymap by typing: qmk compile -kb keychron/v6/ansi -km shaneboulden.
You'll now see a new sub-directory with your keymap.c file already created:
$ tree keyboards/keychron/v6/ansi
keyboards/keychron/v6/ansi
├── ansi.c
├── config.h
├── info.json
├── keymaps
│   ... (snip)
│   ├── shaneboulden
│   │   └── keymap.c
│   ... (snip)
└── rules.mk
Now you're ready to go!
Building a QMK keymap for OpenShift
I mentioned earlier that I want to use a new feature to support my OpenShift developer workflows, specifically the QMK leader key. You might have come across a leader key before in vim - essentially it's a shortcut to user-defined shortcuts. For example, you might find something like this in a .vimrc file:
let mapleader=","
noremap <Leader>W :w !sudo tee % > /dev/null
When you hit ,W in vim, this command will execute in a shell and save the current file using sudo.
Configuring a leader key in QMK is very similar, and allows us to create user-defined shortcuts. I've chosen three shortcuts initially for my OpenShift developer setup:
<Leader>O- Print out "OpenShift is awesome!"<Leader>P- Print theoc new-projectcommand<Leader>N- Print theoc new-appcommand<Leader>K- Print theoc apply -k .command to apply Kustomize manifests from the current directory
To create a leader key in QMK we first need to create a rules.mk file and add LEADER_ENABLE = yes. Then, we can override the leader_start_user(void) and leader_end_user(void) functions in keymap.c:
void leader_start_user(void) {
    // Do something when the leader key is pressed
}

// Leader definitions
void leader_end_user(void) {
    if (leader_sequence_one_key(KC_O)) {
        // Leader, o => Types the below string
        SEND_STRING("OpenShift is awesome!");
    } else if (leader_sequence_one_key(KC_N)) {
        // Leader, n => Creates a new OpenShift app
        SEND_STRING("oc new-app ");
    } else if (leader_sequence_one_key(KC_P)) {
        // Leader, p => Creates a new OpenShift project
        SEND_STRING("oc new-project ");
    } else if (leader_sequence_one_key(KC_K)) {
        // Leader, k => Applies kustomize manifests
        SEND_STRING("oc apply -k .");
    }
}
Finally, we need to add the QK_LEAD key into the keymap. I want to override the numpad Enter key, which is annotated KC_PENT in the below matrix:
[WIN_BASE] = LAYOUT_ansi_108(
        KC_ESC,             KC_F1,    KC_F2,    KC_F3,    KC_F4,    KC_F5,    KC_F6,    KC_F7,    KC_F8,    KC_F9,    KC_F10,   KC_F11,     KC_F12,   KC_PSCR,  KC_CRTA,  RGB_MOD,  _______,  _______,  _______,  _______,
        KC_GRV,   KC_1,     KC_2,     KC_3,     KC_4,     KC_5,     KC_6,     KC_7,     KC_8,     KC_9,     KC_0,     KC_MINS,  KC_EQL,     KC_BSPC,  KC_INS,   KC_HOME,  KC_PGUP,  KC_NUM,   KC_PSLS,  KC_PAST,  KC_PMNS,
        KC_TAB,   KC_Q,     KC_W,     KC_E,     KC_R,     KC_T,     KC_Y,     KC_U,     KC_I,     KC_O,     KC_P,     KC_LBRC,  KC_RBRC,    KC_BSLS,  KC_DEL,   KC_END,   KC_PGDN,  KC_P7,    KC_P8,    KC_P9,
        KC_CAPS,  KC_A,     KC_S,     KC_D,     KC_F,     KC_G,     KC_H,     KC_J,     KC_K,     KC_L,     KC_SCLN,  KC_QUOT,              KC_ENT,                                 KC_P4,    KC_P5,    KC_P6,    KC_PPLS,
        KC_LSFT,            KC_Z,     KC_X,     KC_C,     KC_V,     KC_B,     KC_N,     KC_M,     KC_COMM,  KC_DOT,   KC_SLSH,              KC_RSFT,            KC_UP,              KC_P1,    KC_P2,    KC_P3,
        KC_LCTL,  KC_LWIN,  KC_LALT,                                KC_SPC,                                 KC_RALT,  KC_RWIN,  MO(WIN_FN), KC_RCTL,  KC_LEFT,  KC_DOWN,  KC_RGHT,  KC_P0,              KC_PDOT,  KC_PENT),
All I would do is change KC_PENT to QK_LEAD:
[WIN_BASE] = LAYOUT_ansi_108(
      ... (snip)
      KC_P0,              KC_PDOT,  QK_LEAD),
Building the firmware and testing it out
Once you've made your changes, you can simply qmk compile to create a binary
$  qmk compile -kb keychron/v6/ansi -km shaneboulden
Ψ Compiling keymap with gmake --jobs=1 keychron/v6/ansi:shaneboulden
... (snip)
Copying keychron_v6_ansi_shaneboulden.bin to qmk_firmware folder                                    [OK]
The process differs between keyboards to flash this onto the device. In my case, there was documentation available on the Keychron website to access the reset button (why is it underneath the space bar?) and then flash the firmware with the QMK Toolbox
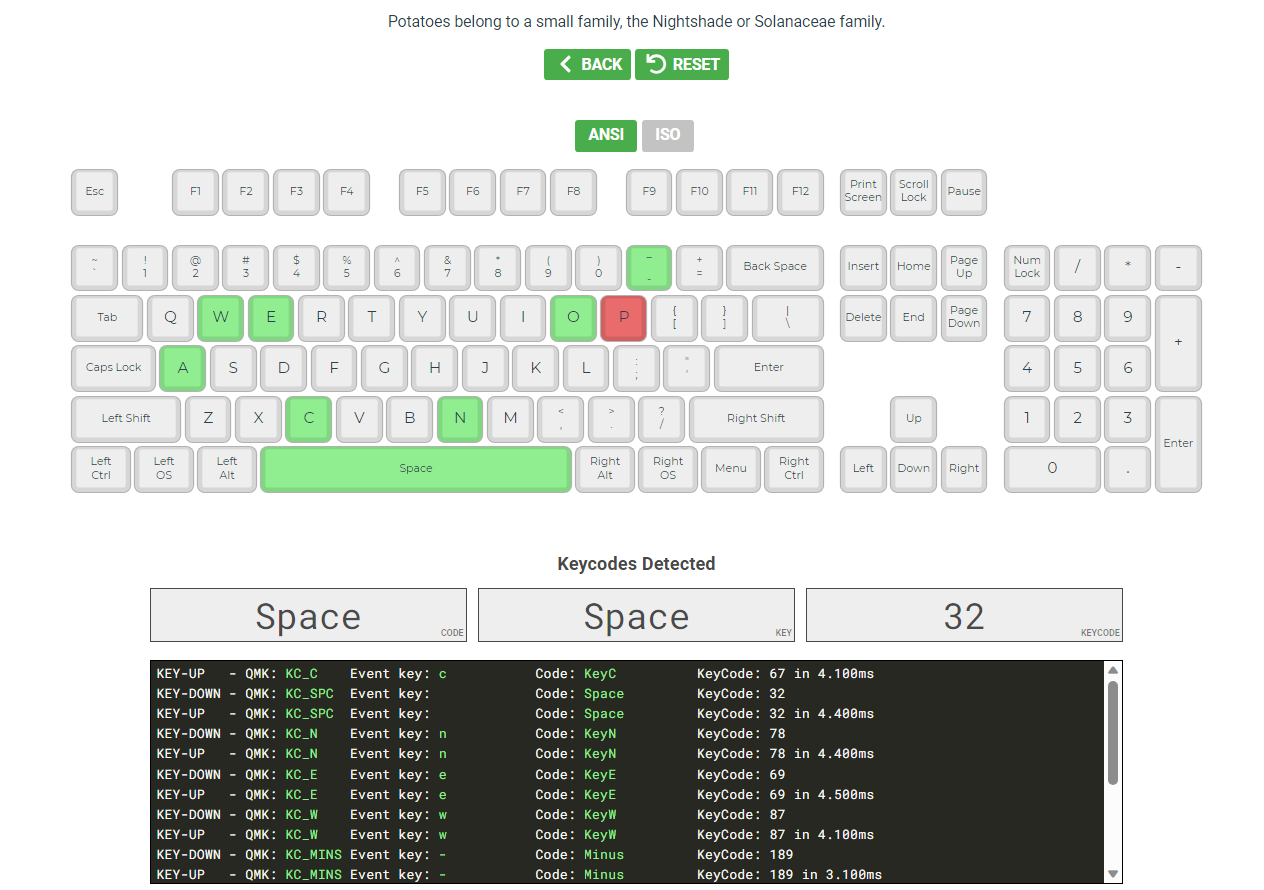
Ok - we're ready to test out the changes! To test out the firmware we can use the QMK Configurator. This is an open source tool that can help build QMK keymaps and configs, and can also test out changes.
When I hit <Leader>K, you can see that the string oc apply -k . is entered.


Similarly, when I type <Leader>N, you can see that the string oc new-app is entered.

Wrapping up
The irony is not lost on me that I've probably typed more characters within this article than I ever would typing out oc new-app in full each time I needed it. But, I hope that this has been interesting journey into QMK and some of its use cases.
If you're interested in learning more about QMK, check out tap dance - easily one of the best features I've seen so far!